How to Build a No-Code Lead Enrichment Workflow
xplore a visual architecture for a no-code lead enrichment workflow, from capturing leads and detecting duplicates to validating enriched data, handling errors, and updating a CRM. Learn how each stage fits together before building the workflow with an automation platform.
- 1.Automated Lead Enrichment Workflow: The Complete Guide
- 2.How to Build a No-Code Lead Enrichment Workflow
How to Build a No-Code Lead Enrichment Workflow
A lead enrichment workflow can look simple on the surface: collect a lead, find additional information, and update a CRM. But a reliable workflow needs to do more than connect a few applications.
It must validate incoming data, identify existing records, determine which fields need enrichment, handle incomplete results, and prevent incorrect updates.
A visual automation workflow makes these steps easier to understand by connecting individual actions, filters, and decision branches into one architecture.
In this guide, we will break down a no-code lead enrichment workflow into its core components and explain how the data moves through the system. The architecture is designed to help you understand the complete process before implementing it in a visual automation platform.
1. What Does a No-Code Lead Enrichment Workflow Look Like?
A no-code lead enrichment workflow uses a visual automation platform to connect lead sources, data providers, validation steps, and destination systems without requiring you to write a complete application.
Each block represents an operation. Connections determine where the data goes next, while filters and conditional branches control what happens under different circumstances.
For example, a lead with valid information might continue to enrichment, while an incomplete record could be sent for review. An existing contact might be updated rather than created again.
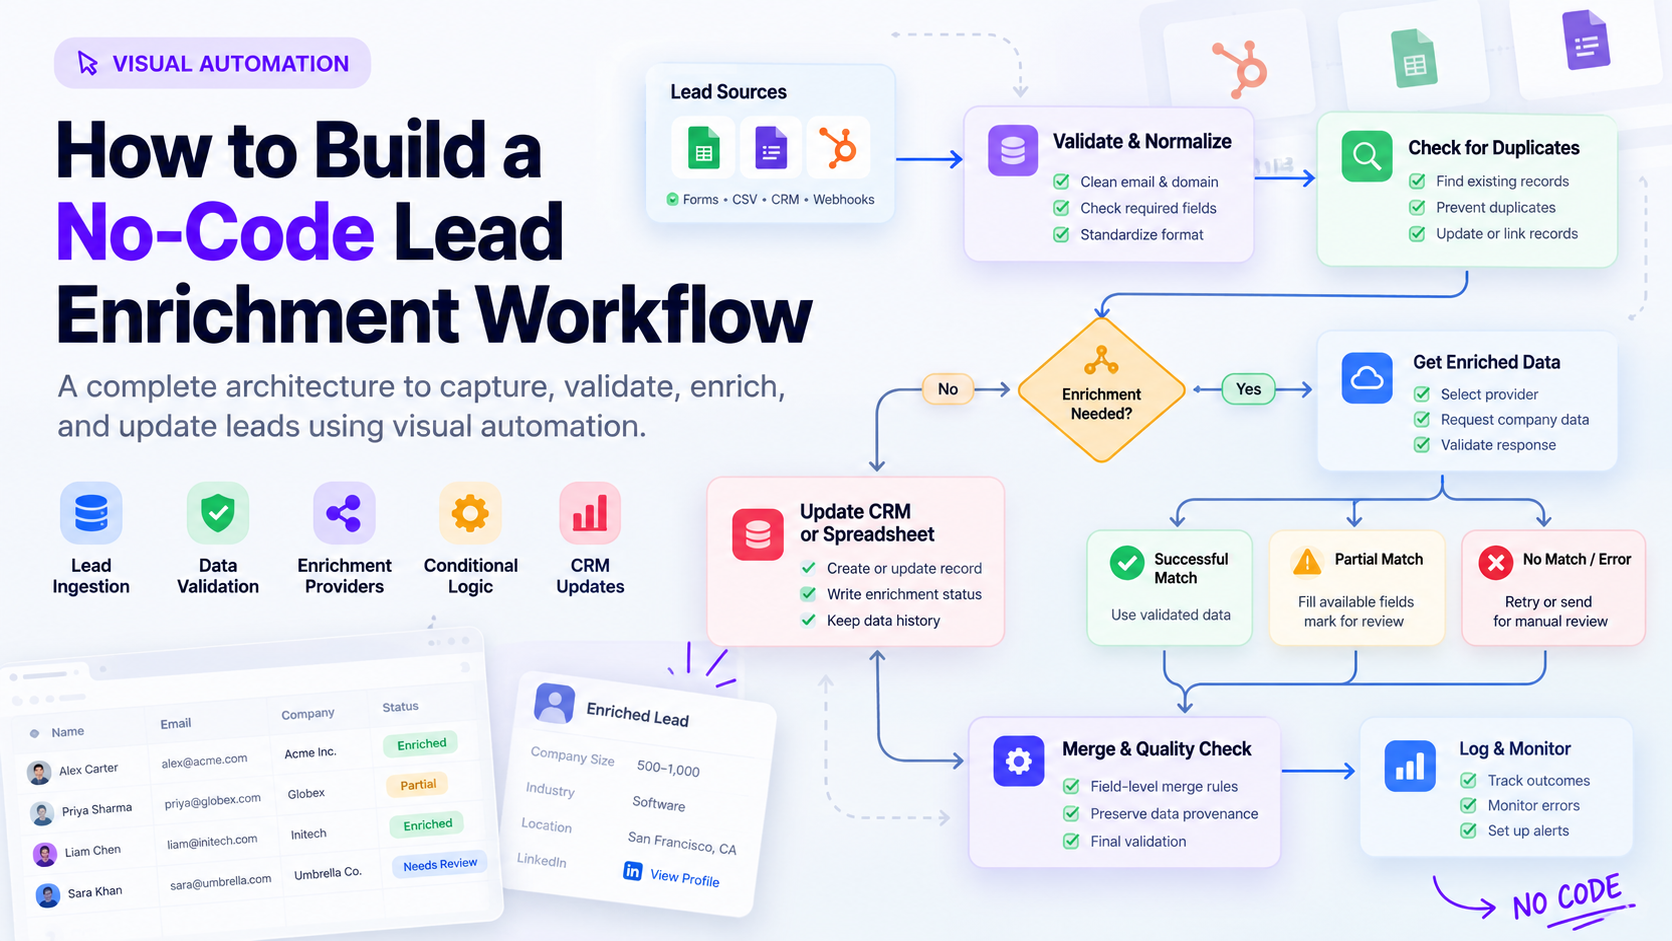
The following architecture illustrates how these components fit together.
2. Lead Enrichment Workflow Architecture
Figure 1: Conceptual architecture of a no-code lead enrichment workflow. This diagram describes the proposed design; it is not a tested automation scenario.
The architecture can be understood as six main stages: ingestion, normalization, identity resolution, enrichment, data quality, and destination updates.
3. Step 1: Capture Leads from Existing Sources
Every workflow starts with an input.
Depending on the tools available, leads might arrive from a website form, an existing CRM, a CSV import, a spreadsheet, or a webhook.
The workflow should establish a consistent input structure before processing the records.
A lead might contain:
- First and last name
- Email address
- Company name
- Company website or domain
- Job title
- Original lead source
Not every lead will contain every field. That is expected, and the workflow should be designed to handle missing values rather than assuming every input is complete.
A stable record identifier or event identifier is also useful for tracking processing and preventing duplicate operations.
4. Step 2: Validate and Normalize the Data
Different lead sources often represent the same information differently.
For example, an email address might contain leading whitespace, a company domain might include a URL prefix, or a required field might be empty.
Normalization creates a consistent representation of the input. Validation checks whether the data meets the workflow's requirements.
Typical operations include:
- Trimming unnecessary whitespace.
- Normalizing email addresses for matching.
- Extracting and normalizing company domains.
- Checking required fields.
- Identifying malformed values.
- Preserving the original input when it is needed for auditing.
A record that fails validation should follow a defined rejection or review path. It should not automatically proceed to an external enrichment provider.
This stage reduces avoidable lookups and makes downstream matching more predictable.
5. Step 3: Identify Existing Records and Duplicates
Before creating a new CRM contact, the workflow should check whether an appropriate record already exists.
A normalized email address or a trusted CRM record ID can help identify a match. Other identifiers may be useful depending on the system and the available data.
A duplicate does not always require deleting or merging records. Sometimes the correct action is to update the existing record or associate the new event with it.
Avoid treating a matching name or company domain alone as proof that two records represent the same person.
When the match is ambiguous, the workflow should preserve the records and request further review rather than making an uncertain merge.
6. Step 4: Determine Which Fields Need Enrichment
Not every lead needs every field enriched.
The workflow should inspect the existing record and determine which fields are missing or sufficiently outdated to justify a refresh.
For example, a record may already contain a company website and industry but lack an employee range or a current job title.
In that case, the workflow should request only the additional information needed, where the provider supports field selection.
This approach can reduce unnecessary provider requests and avoid overwriting useful existing data.
The refresh rules should be defined separately for each field because company information, job titles, and verification statuses can change at different rates.
7. Step 5: Select a Provider and Retrieve Additional Data
Once the workflow identifies the missing fields, it can select an appropriate enrichment provider.
The provider may supply company information, contact attributes, or other supported data. Coverage depends on the provider, the input identifiers, the target market, available permissions, and the fields requested.
A visual workflow can represent this operation through a native integration or an HTTP request module, depending on the automation platform and provider.
The important architectural principle is to keep provider selection separate from data validation and merging. That makes it easier to change providers without changing every downstream step.
If no suitable free provider or integration is available, the workflow should record the limitation instead of pretending the enrichment succeeded.
8. Step 6: Validate Responses and Handle Conditional Branches
A successful API request does not guarantee that the returned data is correct or complete.
The workflow should distinguish between several possible outcomes.
Successful match: The response contains the required fields and passes the defined validation checks.
Partial match: Some useful information is available, but other requested fields remain missing.
No match: The provider could not establish an acceptable match.
Temporary error: The request failed because of a potentially recoverable issue, such as a rate limit or temporary service failure.
Invalid response: The returned data does not meet the expected schema or validation rules.
Each outcome should follow a defined branch. Partial results can continue through the pipeline when appropriate, while ambiguous matches can be sent for review.
Temporary errors may be retried using bounded retry rules and suitable delays. Permanent failures should not be retried indefinitely.
This conditional logic is what turns a basic sequence of connected blocks into a more robust workflow architecture.
9. Step 7: Merge Fields and Preserve Data Provenance
Once the returned information passes validation, the workflow must decide which values to keep.
A useful merge policy considers:
- Whether the existing field is already populated.
- Which source supplied each value.
- Whether the incoming value has been verified.
- How recently the value was retrieved.
- Whether an approved refresh rule allows replacement.
For example, a newly returned company industry should not automatically replace a trusted existing value simply because it arrived later.
The workflow should also preserve data provenance: the source of a value and, where appropriate, its retrieval timestamp and verification status.
If two sources conflict and the rules cannot establish which is more trustworthy, the workflow should flag the conflict rather than silently selecting a winner.
10. Step 8: Update the CRM or Spreadsheet
After merging and validating the data, the workflow can update its destination.
The destination might be a CRM, a spreadsheet, or another supported system.
Where possible, use an operation that updates an existing record or creates one only when an appropriate match does not exist.
Write the enrichment outcome alongside the updated fields. Useful status values include:
- Complete
- Partially enriched
- No match found
- Needs review
- Failed
These statuses make it easier to identify records that require attention.
The workflow can optionally continue into lead scoring or routing after the required data quality checks pass. Scoring rules should use available evidence and should not treat missing information as proof that a lead is unsuitable.
11. Step 9: Monitor Outcomes and Recover from Failures
A reliable architecture also needs visibility into what happened after processing.
Track successful updates, partial results, validation failures, duplicate detections, provider errors, and records sent for review.
Retries should be bounded, and repeated processing should not create duplicate contacts or trigger unwanted side effects. Stable record identifiers and idempotent update operations help achieve this.
Monitoring should also distinguish between an unavailable provider and a provider that is responding successfully but returning poor matches.
These controls make the workflow easier to troubleshoot and improve over time.
12. How to Use This Architecture Before Building
Before implementing the workflow in a visual automation platform, define:
- The lead sources and required input fields.
- The normalization and validation rules.
- The identifiers used for record matching.
- The conditions that trigger enrichment.
- The available providers and their supported fields.
- The branches for successful, partial, and failed results.
- The field-level merge and refresh policies.
- The destination update behavior.
- The retry, logging, and monitoring requirements.
Once these decisions are clear, each stage can be translated into platform-specific modules, filters, and connections.
The architecture is deliberately independent of a particular automation platform. The exact modules and configuration depend on the tools and integrations available to the implementation.
Conclusion
A no-code lead enrichment workflow is more than a chain of integrations. It is a coordinated process for validating input, resolving existing records, retrieving relevant data, managing conflicts, and updating business systems safely.
Starting with a clear architecture makes it easier to understand the required components before configuring individual automation modules.
Want to build this workflow in practice? Continue with our upcoming guide, How to Build a Self-Hosted Lead Enrichment Workflow with n8n, which will cover the hands-on implementation. We will add the internal link when that tutorial is published.
At Causly Lab, the goal is to make complex automation architectures easier to understand and implement, one practical workflow at a time.